Showing posts with label Framelits. Show all posts

February Ladies Class Projects


For February's Ladies Class projects I knew I wanted to create some kind of Easter, but I also wanted to use some of the new goodies in the Occasions Catalog. I was so conflicted that the only logical thing to do was to make 3 different projects.


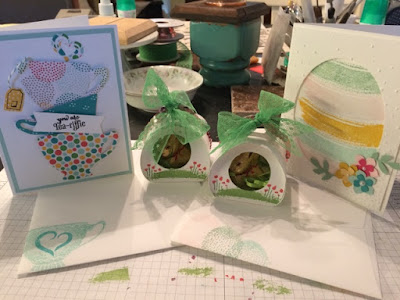
I have the Curvy Keepsake Box Thinlits (135853) for quite a while and never used them. I was so intimidated by them that I never even tried to make one. But when I saw the idea of punching a hole and adding a chocolate bunny, I put my fears aside and I did it! Oh my goodness they are so adorable AND so easy!

Don't they remind you of the sugar shaped eggs that have the little Easter scene inside?


For the Easter card we used the Work of Art Stamp Set. Isn't that Easter Egg cute? I always get hung up on the fact that I don't have an "egg" shaped framelit so I don't venture out of my zone to use a plain ol' oval. I'm so glad others are not as limited and show that it is ok to use an oval for an egg.

For the Occasions Catalog product I decided I wanted to share the  Cups & Kettle Framelits (140624). I don't know what it is about tea cups, but I love them! I am the Scrap Saving Queen, and I try to use them when I can. The paper I used is the Cherry on Top Designer Series Paper Stack (138443)
I love using Dimensionals so we glued the bottom of the cup and used Dimensionals for the top of the cup to give it a little bit of a 3-d effect.
We also used the A Nice Cuppa Stamp Set (140683). You would never know to look at it, but the middle of the cup didn't stamp well. I'm sure it was because I was using an old, wavy ink pad. So how did I fix it? I stamped the heart from the set in the middle. Now it looks like I meant to do that!
I love how sometimes you can make a mistake, and if you didn't give it away, the other person would think you meant to do that and would want to know how you did that cool technique. Ha! If they only knew.

What do you think?


...January Hostess Club Project


This month I wanted to use items from the It's My Party Suite.

After making our Christmas Shaker cards last month I wanted to make another one, because they are so much fun! One thing I have learned about making these is that it is so easy to over-do the contents of the shaker. Less really is more in this case.

I made so many different "prototypes" of this card that it was hard to decide which one to post. And because they are so awesome they went fast to several birthdays I had this month.

For both the outside and inside I used the Party Pop-Up Thinlits Dies (140620). For the outside, instead of using it as a pop-up, I trimmed it from the base of the cardstock.

I also used the It's My Party Designer Series Paper Stack (140552) to "trim" the sides of the Melon Mambo and to layer behind Hip Hip Hooray!

The ink colors were Melon Mambo, Mint Macaron & Crushed Curry. The embossing folder is the Confettie Textured Impressions Embossing Folder (140592).


We had so much fun making this card. For me, it was hard to not over-do it.

What is your favorite thing about this card?


July Ladies Classes

Oh my goodness! I love this month's projects! I have been wanting to use the Just Kidding stamp set for a while, but other projects pushed it out of the way. I love that set so much that I ended up purchasing 2 sets, on accident! I've never done that before.

And let me tell you the Butterfly card, this picture does not do it justice. At. All! I keep walking by it and my heart melts every time I see it. I may have to make a dozen more of this one.

Butterfly Card - this card uses a sponging technique that is fun and relaxing.
Just Kidding Card supplies

Product List


Will You Say...

We have always loved watching "Say Yes to the Dress" on TLC. We have even watched their spin off show, "Say Yes to the Dress - Atlanta". It's interesting to watch how family members and sometimes even grooms, push their opinions of the dress the bride should wear onto the bride, and not listened to what she wants. After all, isn't it supposed to be her special day. She wants to feel like a princess, even if it is only for one day in her life.

In honor of the show, I made some very special "invites" for a group of bridesmaids and maid of honors. The bride had already asked the girls if they would & could be in her wedding, I just thought it would be extra special if the bride sent them a special invitation to be in the wedding party.


Isn't this the most adorable card? It is closed with a belly band that says, 'Will you...' and then inside it says, '...say "Yes to the Dress" and be my Bridesmaid (or Maid of Honor for those girls)'. Wouldn't you agree, it's adorable? I'm very pleased at how it turned out.

This card uses a lot of retired Designer Series Paper and retired Blush Blossom Cardstock. It also uses the new Dress From Pop 'n Cuts and Card Base and the Dress Up Framelits Dies. I made one extra for her smash book, and I will eventually give it to her, after I'm done showing it off and looking at it.

If you would like to order your own set click here. The photo shows the Card Base & Pop 'n Cuts as though it is part of the bundle, but it is not part of the bundle, they are separate. I just don't want anyone to get the wrong impression.

Thanks for stopping by.


August Ladies Classes

If you missed Ladies Classes yesterday, here are the projects we made. We had a lot of fun making these and enjoying each others company.

  • Whisper White Cardstock (5.5"x8.5" & 4"x5.25")
  • Daffodil Delight Cardstock
  • Island Indigo Cardstock
  • Melon Mambo Cardstock
  • Island Indigo Classic Stampin' Pad
  • Perfectly Penned Stamp Set
  • Garden Gingham Washi Tape
  • Delicate Designs (Doily Border) Embossing Folder
  • Basic Rhinestones
  • Dimensionals


  • Natural Composition Specialty Paper (4-3/4"x12)
  • Strawberry Slush Cardstock
  • Very Vanilla Cardstock
  • Soft Sued Classic Stampin' Pad
  • Strawberry Slush Classic Stampin' Pad
  • Baked Brown Sugar Ruffle Ribbon
  • Card Base Pop 'n Cuts
  • Dimensionals

I loved this when I saw it, it's a gift card/cash gift holder. I love finding new ways to use things that weren't their original purpose. It's so easy too!
Using the Simply Scored Tool, place the die cut piece (4-1/4"x11) with the flat end in the left corner and then score at are 1", 3-3/4" & 8-1/4".


I am in love! I know I have said this several times when something new comes out, but I am, again.
It is the new Label Card Thinlits Die. It looks pretty amazing as it is, right? But wait, there's more.....
  • Cherry Cobbler Cardstock
  • Whisper White Cardstock 
  • Silver Glimmer Paper
  • Season of Style Designer Series Paper
  • Tag It! Stamp Set
  • Cherry Cobbler Classic Stampin' Pad
  • Label Card Thinlits Die


When it's opened, the label part flips! It's awesome. What's even more awesome is the way you can make this card bigger than the die actually cuts.


When you use the full die as it is, it will cut a flat card 5-1/2"x6" and when it is folded it becomes 5-1/2"x4-1/4", which is great but I want a flap to cover what I'm writing so how do you do that? I'm glad you asked. 


Start with a piece of cardstock 8-1/2"x5-7/16" (that's a smidgen under 5-1/2"). You want it to be slightly less than 5-1/2" so that you can slide the cardstock into the die and you have a "tail that sits on top of the die.

The beauty of this is that the place where the cardstock sits on top of the top creates a crease in just the right spot so you can fold it in towards the middle of the card and it hides anything you want to write on inside. Giving your card an element of surprise when it gets opened.
Thanks for stopping by and I hope I'll see you at the next Ladies Class in September.

--Marion

Ladies Classes Projects - March 2013

These are the cards we made at this month's Ladies Classes. I just love, love, love, the new Dressed Up Framelits. I'm also loving the new Clear PhotoPolymer stamps Stampin' Up! just released. Because these are made with PhotoPolymer and not cheap, silicone or vinyl they hold the ink much better and give a better impression than the other clear stamps I've used in the past. You can read more about it here. 
I will post the supplies used to make these cards at the end of this post. You can get everything you need to make these projects in my online store by clicking here.

 
This card came from Becky Roberts (Inking Idaho), you can see her orginal post here. The trick to folding the skirt is to fold make one fold 1/3 down, then with the folded side up fold one side at about a 1/3 of the way, clear as mud? I'm posting pictures because I was having the toughest time wrapping my head around how to do this, thank you to Mary Sinco for explaining it to me in way I could understand.

  You want to see some of the solid, undecorated part when you make the first fold. It might be more like 1/4 of the doily folded for the second one.

 The picture on the left does not look much like a skirt but with a slight turn, viola! A skirt has been made, but what about the point, you ask? Just fold it to the back.

 The only glue I used to hold down the skirt was one dot on the folded point, and then a line, kind of like making a lower case I. This is probably way more detail than you need but sometimes I over-think things and I wanted to make it easy for you to figure out too.

This  next card is brought to you by Linda Heller over at StampingSchool.com. For a low annual membership she post 2-3 videos a week, this is one of the cards from this weeks selection, with a slight modification. I did the sentiment differently than she did. I love how the dress form looks more like it's the negative image instead of cut out and glued on after it was stamped and colored. Besides the Dress Up Framelits, I love the Elements of Style Stamp Set, so what better way to use them then together?
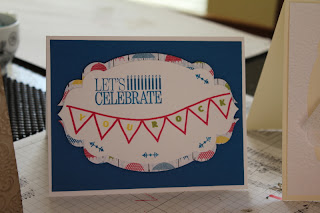
 
This card was inspired by a couple of cards, but it is definitely a Marion Design. This card uses the new PhotoPolymer stamp set Designer Typeset. It's not a set I would normally get but I had to try out the new clear stamps, and let me tell you, I love them! Not only do they stamp very well, they are pliable. Meaning you can shape them. The pennant banner comes in the package straight, but I curved it on the block. And speaking of putting them on the block, they are incredibly sticky, you won't have trouble with these staying on. The letters are very tiny and I've read where one popped off during cleaning and has not been seen again, so care is needed when cleaning so they don't sprout wings and disappear, forever living a Gecko lifestyle, blending in with its surroundings.

Becky Roberts Dress Up Card
  • 101650 Very Vanilla Cardstock
  • 100730 Whisper White Cardstock
  • 121045 Basic Black Cardstock
  • 127003 Apothecary Accents Framelits
  • 130101 Dress Up Framelits
  • 127819 Lacy Brocade Embossing Folder
  • 126869 5/8" Flower Trim
  • 129399 Paper Doilies
  • 121884 1/2" Rose Red Seam Binding Ribbon
  • 119247 Pearl Basic Jewels

Stamping School Dress Up Card
  • 120953 Crumb Cake Cardstock
  • 126841 Primrose Petals Cardstock
  • 101650 Very Vanilla Cardstock
  • 121878 First Edition Designer Series Paper
  • 126975 Crumb Cake Classic Stampin' Pad
  • 126978 Soft Suede Classic Stampin' Pad
  • 100045 Pretty In Pink Stampin' Write Marker
  • 105106 Cetainly Celery Stampin' Write Marker
  • Elements of Style Stamp Set (Clear or Wood Options Available)
  • Petite Pairs Stamp Set (Clear or Wood Options Available)
  • 130101 Dress Up Framelits
  • 129021 Window Frames Collection Framelits
  • 119851 Curly Label Punch
  • 126869 5/8" Flower Trim
  • 122332 1/2" Crumb Cake Seam Binding Ribbon

PhotoPolymer Marion Design Card
  • 100730 Whisper White Cardstock
  • 111350 Pacific Point Cardstock
  • 126922 Sunshine & Sprinkles Designer Series Paper
  • 126984 Lucky Limeade Classic Stampin' Pad
  • 126944 Daffodil Delight Classic Stampin' Pad
  • 126951 Pacific Point Classic Stampin' Pad
  • 126948 Melon Mambo Classic Stampin' Pad
  • 132956 Designer Typeset PhotoPolymer Stamp Set
  • 127003 Apothecary Accents Framelits
  • 127022 Cloudy Day Embossing Folder

Supplies necessary for all cards
  • 110755 Multipurpose Liquid Glue
  • 104430 Stampin' Dimensionals
  • 104332 SNAIL Adhesive
You can order everything you need to make these cards in my online store by clicking here.

Thanks for stopping by!
--Marion