Showing posts with label Stampin' Trimmer. Show all posts

It's time once again


It's that time of year again! We now get to discover which beloved Stampin’ Up! products need to be hoarded for all eternity from the annual catalog. It is a sad time as we mourn the loss of our favorite papers and/or panic because we absolutely have to purchase that stamp set we've had our eye on as it embarks on its next adventure, retirement.

Your frantic scrolling and adding products to your shopping cart may commence via Retiring Products on the Shopping Site link I have provided or by clicking the specific Categories below.

 Retiring Bundles  The "Other" Category

Stampin' Up! is always changing and evolving as it embraces the next greatest crafting trends. One way we will see this happening is the use of the new Cling Mount, hence forward all wood mount and clear mount stamps that will be joining us in the new catalog will be Cling Mount.

There are several sets however on the retirement list that look as if they are going away forever but breath easy, they are just being reconfigured into the new style. Below are those stamp sets that will be getting a face lift in the new catalog, so stay calm and stamp on.


Accented Blooms Dashing Deer Little Twinkle
Animal Outing First Frost Love you to Pieces
Artisan Textures Flourishing Phrases Magical Mermaid
Barn Door Gallery Grunge Painted Glass
Beautiful Day Handwritten Peaceful Place
Beautiful You Healing Hugs Perennial Birthday
Bee Thankful Heartland Pop of Petals
Birthday Backgrounds Hold On To Hope Rooted in Nature
Bokeh Dots Itty Bitty Birthdays Sea of Textures
Botanical Bliss  Itty Bitty Greetings Sorry for Everything
Buffalo Check  Kindness & Compassion Special Celebrations
Country Road Label Me Pretty Stitched All Around
Crafting Forever Lilypad Lake This Little Piggy
Dandelion Wishes Little Elephant Tropical Chic


Winter Woods

Retiring Stamps
If you are a planner and want to plot out every item in your stash that you need more of/never want to lose, at least for a few more months, I do have the retirement list for the Annual Catalog in an Excel worksheet. If you would like a copy, leave a comment below or email me and I will email it to you.

Now if you’ll excuse me, I need to go frantically scroll and add things to my shopping cart. If you need me I’ll be at the  Retiring Products page.

...January Ladies Class Projects


Diamond Box by Jessica Winter Artisan Design Team 2015-2016 Member Ladies Class Project MarionCreates.comThis wonderful box was on the Stampin' Up! blog and created by Jessica Winter, Artisan Design Team 2015-2016 member. It is so unique and easy I knew we had to make it in the January Ladies Classes. The instructions, with pictures, for this box are below. You will be using the Gift Bag Punch Board for this project.
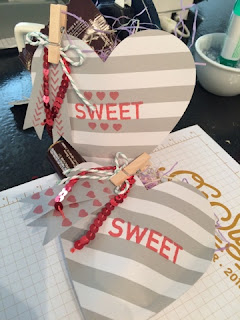
January Paper Pumpkin Valentine Treat Pouch Ladies Class Project www.MarionCreates.com
The second project are these Sweet Valentine Pouches made from the January Paper Pumpkin Kit. There are about 5 colors to choose from, I chose Tip Top Taupe. They are so quick & easy.
Supplies Needed:
  • Gift Bag Punch Board
  • 8.5"x3.25" Cardstock for the Bottom 
    • Score the long edge at 3/4"
  • 3-9/16"x3-9/16" Designer Series Paper for the Top
    • You will score this piece at 3/4" all the way around as shown in the picture
  • Tear & Tape
    • Bow Builder Punch, Sweetheart Punch, Itty Bitty Punch Pack
    • Embellishments as Desired
    All score lines have been marked with a marker for the purpose of this tutorial, so the lines can be seen easier. You will only score, don't use a marker for your box.

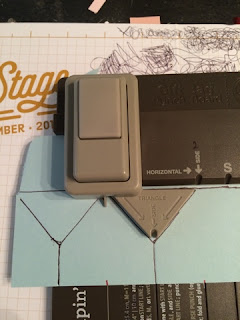
    First you want to insert you 8.5"x3.25" piece of cardstock all the way into the Gift Bag Punch Board, making sure the left edge is aligned with the start line, punch, then score your "Martini Glass" and the top horizontal line. You will have to scoot your cardstock to the right to make the horizontal line go all the way to the left edge of your cardstock. With a pencil make a small tick mark at the lower edge of the cardstock on the "S" line.


    Diamond Box by Jessica Winter Artisan Design Team 2015-2016 Member Ladies Class Project MarionCreates.comDiamond Box by Jessica Winter Artisan Design Team 2015-2016 Member Ladies Class Project MarionCreates.com

    Move your cardstock to the left, lining up the little tick mark with the start line. Repeat the step above, only this time you won't need to move your cardstock to the right to complete the horizontal line, just score the horizontal line along with making your "Martini Glass".

    When you get done, your box bottom will be score and punched as show in the second picture below. The horizontal line at the bottom of the "Martini Glasses" is 3/4", score that using a paper trimmer fitted with a scoring blade or the Simply Scored Plate.

    Diamond Box by Jessica Winter Artisan Design Team 2015-2016 Member Ladies Class Project MarionCreates.com
    Diamond Box by Jessica Winter Artisan Design Team 2015-2016 Member Ladies Class Project MarionCreates.com
    The "flaps" at the top of the cardstock strip are actually the box bottom flaps. To score you will fold your flaps with a "mountain" fold, the 3/4" top as a "valley" fold. The "Martini Glass" will be a "mountain" fold, gently fold the diagonal lines and the "stem" of the "Martini Glass" will just follow.  Your instinct will be to fold the last 1/4" flap that holds the box together, don't. if you do than your fourth side will not be a flat fourth size but rather a weird 4th & 5th side and your lid won't fit properly. Ask me how I know.
    Either before or after folding on all the lines, cut a couple of notches on the last 1/4", you can also add Tear & Tape.
    Diamond Box by Jessica Winter Artisan Design Team 2015-2016 Member Ladies Class Project MarionCreates.comDiamond Box by Jessica Winter Artisan Design Team 2015-2016 Member Ladies Class Project MarionCreates.com
    Remove the protective paper from the Tear & Tape and adhere the tab on the inside of the box, lining up the points and creating a new "Martini Glass".
    Diamond Box by Jessica Winter Artisan Design Team 2015-2016 Member Ladies Class Project MarionCreates.com
    To put assemble the lid, score all four sides at 3/4" either with a Paper Trimmer fitted with a scoring blade or with the Simply Scored Plate. Cut notches on each of the four "squares" created from scoring. Fold on all the score lines and adhere the corners on the Inside of the rectangles, as to hide the tabs.
    Diamond Box by Jessica Winter Artisan Design Team 2015-2016 Member Ladies Class Project MarionCreates.com


    Diamond Box by Jessica Winter Artisan Design Team 2015-2016 Member Ladies Class Project MarionCreates.com
    I hope that was helpful. Comment below if you have an questions.


    All New Stampin' Trimmer


    Introducing the new and improved Stampin' Trimmer! Although paper trimmers are a common crafting tool, this trimmer was designed exclusively by paper crafters for paper crafters-and because it was made by Stampin' Up!, you know it's a cut above the rest! Please note, the cutting and scoring blade refills will be available early in December.

    Features of the All-New Stampin' Trimmer
    • An extra-wide 6-1/4" cutting base and an extended 14-1/2" ruler
      • The extra-wide cutting base provides a large work area and is marked in 1/4" (4 mm) increments, allowing for small measurements. 
      • The right-side grid helps you measure and cut very thin strips.
      • The extended cutting arm has a stabilizing leg to provide a sturdy and steady cutting surface for longer cuts. 
      • When fully extended, the extended cutting arm sits flush with the trimmer base, providing more accurate and consistent measurements across the entire surface.
      • The cutting base and track include a full ruler, incorporating measurements down to 1/16" and grid lines that mark each quarter inch. 
      • All rulers and measurements on the base are printed under a plastic cover so your measurements won't wear off.
      • The base has nonskid feet, which keeps the Stampin' Trimmer securely in place on your work area.
    • A full 12" cutting and scoring track
      • The extra-long cutting track has space at the top and bottom so you don't have to take the cutting and scoring blades out when you're not using them. 
      • The track gives you enough space to cut or score a full 12" (30.5 cm) without having to remove or switch out handles. 
      • The cutting track locks in place for secure storage or transport. 
      • The track includes an insertion point for cutting and scoring blade handles so you can easily insert handles into the cutting track.
    • Specially designed handles and cutting track to ensure straight cuts
      • The hook on the scoring and cutting blade handles keeps the handles stable so the cuts are as straight as possible.
      • Handles come in two colors: dark for cutting, light for scoring. 
      • The precision tip on the cutting blade allows you to pinpoint precisely where you're cutting.
      • The point on the side of each handle shows you where the blade will cut, making it easy to see exactly where your cuts and scores will begin.
    • Storage compartment under base
      • The storage compartment holds scoring and cutting tools such as a Bone Folder, Simply Scored Stylus, extra scoring and cutting blades, and even business cards. 
      • Separate compartments within the storage compartment keep your tools organized, and the clear cover makes it easy to see what you've stored.
    • Product details: item 126889; $29.95