Showing posts with label New Product. Show all posts

February Ladies Class Projects


For February's Ladies Class projects I knew I wanted to create some kind of Easter, but I also wanted to use some of the new goodies in the Occasions Catalog. I was so conflicted that the only logical thing to do was to make 3 different projects.
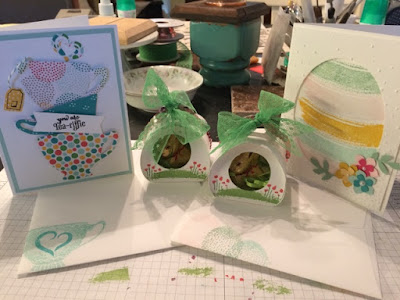


I have the Curvy Keepsake Box Thinlits (135853) for quite a while and never used them. I was so intimidated by them that I never even tried to make one. But when I saw the idea of punching a hole and adding a chocolate bunny, I put my fears aside and I did it! Oh my goodness they are so adorable AND so easy!

Don't they remind you of the sugar shaped eggs that have the little Easter scene inside?


For the Easter card we used the Work of Art Stamp Set. Isn't that Easter Egg cute? I always get hung up on the fact that I don't have an "egg" shaped framelit so I don't venture out of my zone to use a plain ol' oval. I'm so glad others are not as limited and show that it is ok to use an oval for an egg.

For the Occasions Catalog product I decided I wanted to share the  Cups & Kettle Framelits (140624). I don't know what it is about tea cups, but I love them! I am the Scrap Saving Queen, and I try to use them when I can. The paper I used is the Cherry on Top Designer Series Paper Stack (138443)
I love using Dimensionals so we glued the bottom of the cup and used Dimensionals for the top of the cup to give it a little bit of a 3-d effect.
We also used the A Nice Cuppa Stamp Set (140683). You would never know to look at it, but the middle of the cup didn't stamp well. I'm sure it was because I was using an old, wavy ink pad. So how did I fix it? I stamped the heart from the set in the middle. Now it looks like I meant to do that!
I love how sometimes you can make a mistake, and if you didn't give it away, the other person would think you meant to do that and would want to know how you did that cool technique. Ha! If they only knew.

What do you think?


...January Hostess Club Project


This month I wanted to use items from the It's My Party Suite.

After making our Christmas Shaker cards last month I wanted to make another one, because they are so much fun! One thing I have learned about making these is that it is so easy to over-do the contents of the shaker. Less really is more in this case.

I made so many different "prototypes" of this card that it was hard to decide which one to post. And because they are so awesome they went fast to several birthdays I had this month.

For both the outside and inside I used the Party Pop-Up Thinlits Dies (140620). For the outside, instead of using it as a pop-up, I trimmed it from the base of the cardstock.

I also used the It's My Party Designer Series Paper Stack (140552) to "trim" the sides of the Melon Mambo and to layer behind Hip Hip Hooray!

The ink colors were Melon Mambo, Mint Macaron & Crushed Curry. The embossing folder is the Confettie Textured Impressions Embossing Folder (140592).


We had so much fun making this card. For me, it was hard to not over-do it.

What is your favorite thing about this card?


June Ladies Class

Sprinkles of Life Card (Ice Cream) - Did you know this set is a Ronald McDonald House Charity set? Stampin' Up! has donated over a Million Dollars to this charity, and with the purchase of this stamp set you can help them give more. $3 from the sale of every one of these stamp sets go to RMHC. Would you like to learn more? Go to www.stampinup.com/giving and see how you can help, beyond purchasing this set.
  • Sprinkles of Life Stamp Set
  • Whisper White Cardstock
  • Watermelon Wonder Cardstock & Ink Pad
  • Chocolate Chip Cardstock & Ink Pad
  • Delightful Dijon Cardstock & Ink Pad
  • Versamark Ink & Iridescent Ice Embossing Powder
  • Elegant Dots Textured Impressions Embossing Folder
  • Tree Builder Punch - for the cloud & the ice cream, isn't that cool? It can also be used as a treetop
  • Banner Triple Punch
  • Cherry on Top Designer Washi Tape
  • And of course, Dimensionals!

Happy Father's Day Card - I love the Guy Greetings stamp set. I'm such a girly girl it's hard for me to like much that a guy would like, but I love this!
  • Guy Greetings Stamp Set
  • a little Gorgeous Grunge to add splatters to the card. Gotta make it look like a guy got to it, right?
  • Sahara Sand Ink Pad
  • Early Espresso Cardstock & Ink Pad
  • Very Vanilla Cardstock
  • White 1-1/4" Jute Ribbon
  • Neutrals Candy Dots - I love these!
  • Typeset Specialty Designer Series Paper. The striped piece we sponged with Early Espresso ink, just to tame the stark whiteness of the paper, it didn't go well with the Very Vanilla color of the cardstock.

New Product - Project Life

Stampin' Up! is so so so excited to let you know we’ve partnered with the amazing Becky Higgins to bring you the real deal—authentic Project Life products, now in exclusive Stampin’ Up! colors and designs. If you’ve somehow missed the Project Life craze, like me, and are wondering what it’s all about: it’s a super simple, totally affordable way to get your photos into albums: you just slip your photos into Photo Pocket Pages and add designed cards. It’s a back-to-basics approach to documenting your life. In a nutshell, it’s all about spending more time making memories and less time scrapbooking them.
You will be able to order a selection of Project Life products starting May 1! And with the launch of our new annual catalog on June 2, you’ll be able to buy from our complete line of Project Life products.
Can’t wait that long? I will be able to order the limited selection starting April 21.

Here are the items you’ll be able to purchase on May 1:


Thanks for stopping by!
--Marion

August Ladies Classes

If you missed Ladies Classes yesterday, here are the projects we made. We had a lot of fun making these and enjoying each others company.

  • Whisper White Cardstock (5.5"x8.5" & 4"x5.25")
  • Daffodil Delight Cardstock
  • Island Indigo Cardstock
  • Melon Mambo Cardstock
  • Island Indigo Classic Stampin' Pad
  • Perfectly Penned Stamp Set
  • Garden Gingham Washi Tape
  • Delicate Designs (Doily Border) Embossing Folder
  • Basic Rhinestones
  • Dimensionals


  • Natural Composition Specialty Paper (4-3/4"x12)
  • Strawberry Slush Cardstock
  • Very Vanilla Cardstock
  • Soft Sued Classic Stampin' Pad
  • Strawberry Slush Classic Stampin' Pad
  • Baked Brown Sugar Ruffle Ribbon
  • Card Base Pop 'n Cuts
  • Dimensionals

I loved this when I saw it, it's a gift card/cash gift holder. I love finding new ways to use things that weren't their original purpose. It's so easy too!
Using the Simply Scored Tool, place the die cut piece (4-1/4"x11) with the flat end in the left corner and then score at are 1", 3-3/4" & 8-1/4".


I am in love! I know I have said this several times when something new comes out, but I am, again.
It is the new Label Card Thinlits Die. It looks pretty amazing as it is, right? But wait, there's more.....
  • Cherry Cobbler Cardstock
  • Whisper White Cardstock 
  • Silver Glimmer Paper
  • Season of Style Designer Series Paper
  • Tag It! Stamp Set
  • Cherry Cobbler Classic Stampin' Pad
  • Label Card Thinlits Die


When it's opened, the label part flips! It's awesome. What's even more awesome is the way you can make this card bigger than the die actually cuts.


When you use the full die as it is, it will cut a flat card 5-1/2"x6" and when it is folded it becomes 5-1/2"x4-1/4", which is great but I want a flap to cover what I'm writing so how do you do that? I'm glad you asked. 


Start with a piece of cardstock 8-1/2"x5-7/16" (that's a smidgen under 5-1/2"). You want it to be slightly less than 5-1/2" so that you can slide the cardstock into the die and you have a "tail that sits on top of the die.

The beauty of this is that the place where the cardstock sits on top of the top creates a crease in just the right spot so you can fold it in towards the middle of the card and it hides anything you want to write on inside. Giving your card an element of surprise when it gets opened.
Thanks for stopping by and I hope I'll see you at the next Ladies Class in September.

--Marion

What to Washi Online Class Now Available


Our next online class-What to Washi-is now available. Offering seven different sections of Washi wisdom, this class includes everything you need to know to make the most of one of the hottest crafting trends out there, including written instructions, step-out photos, instructional videos, and supply lists for more than 30 projects.

The following topics are covered in the class:

. The Washi Basics
. Washi-The Next Step
. Above and Beyond
. Sharing Washi with Others
. Memory Keeping
. Storage
. Only the Beginning. . .


And wait, there's more! This class is also being offered as part of the What to Washi Bundle. When you order the bundle you receive four packages of Washi Tape; each packages contains three coordinating rolls of Stampin' Up!'s exclusive Washi Tape for a total of 12 rolls. And when you order the What to Washi Bundle, you'll be the first to receive our Season of Style and Witches Brew Washi Tape packages; they aren't available to individual purchase until August 1.
Will be available until January 2, 2014

PC Instructions
When in the download center be sure to click Windows and For My Digital Studio, I know it sounds weird but that is what I had to do to get it to work properly. It doesn't actually install into My Digital Studio, you can choose a folder to install it to.
The files will be downloaded as archive files that you can then extract and save on your computer. When you click on the download link, an extraction program will automatically launch. Choose the location where you would like to save the files (be sure to note where you save them). Follow the prompts on the extraction program, then navigate to the location where you saved the files. Click on the file and open.

Mac Instructions
When you click on the download link, the file will be mounted as a drive. Once it is mounted, open the drive and drag and drop the files to the location of your choice on your hard drive. The files can then be opened.