Showing posts with label Birthday. Show all posts

Anyone Can....

Anyone can buy a card at the store, but very few spend therapeutic time creating cards.

Yeah, I said therapeutic. Because being crafty is therapeutic. Some find it by following directions to create their masterpiece, while others find it by creating something that is totally their own.

Every time someone new comes to the classes I offer, they always have a great time. So much so, it kind of surprises them. They expected to come and make something. To be creative, or crafty or just to play with artistic things, so they can feel artistic. They don't expect the laughter, or the new friends they will make.

During the last 15 years, the thing that surprises me the most, even though it shouldn't, are the friendships that are formed, that wouldn't have, if it hadn't been for the classes they come to.

People, who would never have meet any other way, becoming the greatest of friends.

And there is plenty of room for more. 

The next new friend making opportunity, or just a therapeutic afternoon of creating will be March 29, 2020; 1pm-4pm. You will get to make a dozen cards and a dozen tags to have ready, so you don't have to go to the store to get a card.
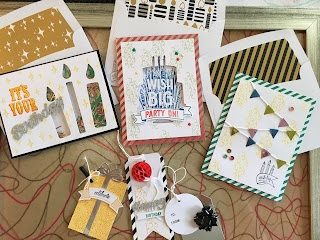
It may seem like you are giving a card to someone, but really, you are getting some well deserved, and needed, creative crafty time. 

They think it's about them and their special day, but really, it's about you and your self-care.

Won't you join us?

Pre-Registration is required and you can do that by going to this link....
https://marion-creates-classes.square.site/ 


Watercolor Wishes Kit

http://www.stampinup.com/ECWeb/ProductDetails.aspx?productID=140406&dbwsdemoid=95651The Watercolor Wishes Card Kit (140406) is an all inclusive kit, that only needs to be supplemented with your favorite adhesive.

The card bases are pre-watercolored and you can make 20 unique designs. It comes with
  • 12-piece Photopolymer Stamp Set
  • Clear acrylic block & 
  • 2 Classic Stampin' Spots in 
    • Night of Navy & 
    • Watermelon Wonder.

http://www.stampinup.com/ECWeb/ProductDetails.aspx?productID=140406&dbwsdemoid=95651And there's so much more!
  • Die-cut pieces & flowers
  • cardstock flag stikcers
  • washi tape
  • sequins
  • wood cutouts, &
  • Stampin' Dimensionals
  • Guide for putting the cards together, but they're your cards you don't have to follow the guide if you don't want to.


http://www.stampinup.com/ECWeb/ProductDetails.aspx?productID=140406&dbwsdemoid=95651Benefits:
  • Great pick up and go project - everything is included!
  • Card bases are already water colored for you so you don't have to mess with the mess
  • You will surely have left over washi tape and embellishments to use on other cards.
  •  12-piece Photopolymer Stamp Set, clear block & Stampin' Spots can be used on more cards, scrapbook pages or anything you want to stamp on!
  • and a box to keep it all contained, but can be used as a Gift Box, in a pinch.


My daughter came down this weekend and made a few cards to take back with her because she needed more. Now for a quick shameless Proud Momma plug...she has her own blog That's Sew Jess. She loves to sew, that's her creative art, and she is great at it too! You should check her out.

The best part is this all inclusive kit is only $35! That's only $2 per card! You can't get away with paying that for a great card these days.

Card sizes are:
  • 4" x 4"
  • 3-1/2" x 5"
  • 4-1/4" x 5-1/2"

Don't forget to add your favorite adhesive by clicking Here. It does come with Dimensionals but you may not have enough to adhere everything down.

So get your kit and make your cards today!


...January Hostess Club Project


This month I wanted to use items from the It's My Party Suite.

After making our Christmas Shaker cards last month I wanted to make another one, because they are so much fun! One thing I have learned about making these is that it is so easy to over-do the contents of the shaker. Less really is more in this case.

I made so many different "prototypes" of this card that it was hard to decide which one to post. And because they are so awesome they went fast to several birthdays I had this month.

For both the outside and inside I used the Party Pop-Up Thinlits Dies (140620). For the outside, instead of using it as a pop-up, I trimmed it from the base of the cardstock.

I also used the It's My Party Designer Series Paper Stack (140552) to "trim" the sides of the Melon Mambo and to layer behind Hip Hip Hooray!

The ink colors were Melon Mambo, Mint Macaron & Crushed Curry. The embossing folder is the Confettie Textured Impressions Embossing Folder (140592).


We had so much fun making this card. For me, it was hard to not over-do it.

What is your favorite thing about this card?


July Hostess Club Project

I am truly aware that we don't make near enough men's cards in my classes so I decided that caseing this one from the catalog would be a wonderful idea. The inspiration I started with can be found on page 83 of the 2015/2016 Annual Idea Book & Catalog.

As you can see from the inspiration, they used Crumb Cake Cardstock for the base, but because I wanted to use the new Corrugate Paper, I decided to start with a Basic Black Cardstock base instead. I don't know what Stampin' Up!'s concept artists used to make the splatters on the card. If they didn't use a stamp it's possible they used an aqua painter, picked up some ink and then flicked it on to the card. You can get the same effect by using a toothbrush.

Stampin' Up!'s version uses:
  • Travler Stamp Set 
  • One Big Meaning Stamp Set
  • Crumb Cake Cardstock & Ink Pad
  • Basic Black Cardstock & Ink Pad
  • Whisper White Cardstock
  • Whisper White Baker's Twine


My Version uses:
  • Traveler Stamp Set
  • Guy Greeting Stamp Set
  • Gorgeous Grunge Stamp Set
  • Basic Black Cardstock & Ink Pad
  • Crumb Cake Corrugate Paper
  • Whisper White Cardstock
  • Soft Suede Cardstock for the envelope
  • Typeset Specialty Designer Series Paper - for the envelope liner. I know it doesn't look like it because the stripes aren't at an angle but it is, trust me.
  • Envelope Punch Board - Because this card is not a standard size, it's actually 4.25"x4.25".
  • Dimensionals, of course.


I Went Rogue


This is July's Paper Pumpkin kit. Isn't is so cute? There are gift boxes and the elements to make cards.

If you know anything about me, you know that I can't leave well enough alone. Yes, there are instructions on how to put these lovely cards together, but.....


I was trying to match the colors in this sweet Dressed Up Framed Art. It's a birthday gift for a lovely friend of mine.


So the first thing I did was cut off a row of the letters that spell Wish. Then I took a sponge and Elegant Eggplant ink to change the color to match closer to the gift.

I didn't want to struggle with trying to get the letters out off the backing so instead of removing the letters, I removed the piece of adhesive card stock around the letters.


As you might notice, the card in this fourth picture is missing a couple of stamped areas. I didn't like the way it was going so I started over on the back side and decided to use it as a layer.

I also wheeled the background with a retired stamp, and the candles are also from a retired set. I just wanted the candles so I used my Melon Mambo Stampin' Write Markers to ink the candles and stamp them on the card. I then added the cupcake punched pieces from the Cupcake Builder Punch. I also added rhinestones to the "frosting", which I colored with the Rich Razzleberry Blendabilites.

Did you notice the Happy Birthday. See how it is curvy? That is one of the many wonderful things about the Photopolymer Stamps. They're flexible. So if you don't want to have a straight line and it's long enough to "bend", you can!


Here they are! The sweet gift for my friend, and the matching Birthday Card.


   And speaking of Birthday Cards, there is a little boy named Danny who has brain cancer. All her wanted for his birthday were cards with his name on them. Not that having his name on them wasn't special, but because he knows how to read his name. So I pulled a card out of my stash, probably one I received as a swap at some point, addressed it and sent it to him. Inside the card I wrote his name and wished him a very happy birthday!

If you would like to send him a birthday card, visit my Facebook page to read more about him and get the address to send him a card.